Main menu
You are here
photoshop pen tool tutorial
Learn how to draw straight and curved vector paths using Photoshop's Pen and Freeform Pen tools.
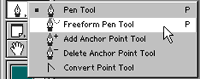
Most of the drawing and editing of paths can be done via the tools under the Pen tool icon in the Tools palette. Click and hold the mouse button on this icon to bring up all the other tools:
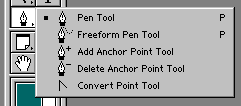
Let's briefly go over these tools now, and what you can use them for.
- The Pen tool is probably the tool you'll use most. With this tool you can create the straight lines and curves that make up your paths.
- The Freeform Pen tool is designed to let you create paths quickly by just drawing freehand with the mouse. It's not very good for creating precise paths though.
- The Add Anchor Point tool allows you to insert additional anchor points into your path, effectively splitting a line segment into two. This is useful if, say, you've created a curve already but you want to turn the curve into a more complex shape. You can also add anchor points using the Pen Tool, provided you have the Auto Add/Delete option set - just move the mouse over the line segment you'd like to add a point to, and click!
- The Delete Anchor Point tool removes anchor points from your path. As it removes a point, it joins up the two line segments either side of the removed point into one long line segment. This is good if you've accidentally created too many segments (it's best to create as few as possible!) or if the Freeform Pen tool has created too many for you! You can also delete anchor points using the Pen tool if Auto Add/Delete is set - move the mouse over the point you'd like to delete, and click.
- The Convert Point tool allows you to convert a smooth anchor point to a corner anchor point, and vice-versa. More on this tool later!
Drawing straight lines
Let's start with the easiest technique. First create a new document of, say, 500 x 500 pixels to give yourself plenty of space to work in. Then select the Pen tool in the Tools palette.
Now click with the mouse in your document. You'll see that you've placed your first anchor point. Move the mouse and click again. You've now created your first line segment, with two anchor points at each end. Congratulations! :)
Click in a few more places in your document. You'll see that each click adds a new anchor point, and a new straight line segment.
Quick tip
Select the Rubber Band option (under the Pen Options drop-down in the options bar) to see where the line is going to be placed before you place it. This is especially useful for beginners, as it enables you to see exactly what's happening!
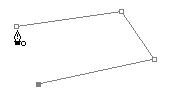
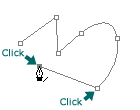
So far, your path is an open path. This means it has a start point and an end point, and doesn't join up. To make a closed path, move the mouse over the first point you created - you'll see the Pen tool cursor changes, with a little 'o' appearing beside it:
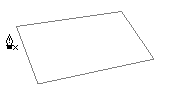
Now click with the mouse, and you'll see that you have now created a complete shape - a closed path. Well done!
Deleting your path
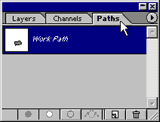
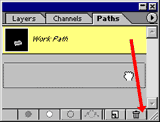
The path you just created is stored in a temporary path called the Work Path. Let's delete this path so we can start again with a clean slate.
Click on the "Paths" tab in the Layers palette to bring up the list of available paths:
Now drag the "Work Path" to the trash can icon:
You're now ready to have a go at tackling curves!
Drawing curved lines
Learning to draw curves will take a bit longer, but they're not too hard once you get the hang of them!
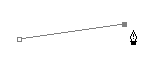
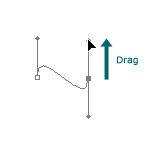
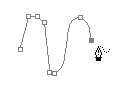
To start a curve, select the Pen tool, click in your document and drag the mouse in the rough direction you want the curve to head - in this example, try dragging vertically up the page:
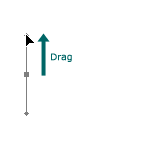
You'll see that as you drag, two direction lines and direction points are created. These control the shape of the curve you're about to produce:
- The direction of the lines determines the direction in which the new curve will head.
- The length of the lines determines how much influence this anchor point will have over the curve. The longer the line, the more the curve will be "pulled" towards this line.
The best way to understand the direction lines is to just play around with them. We'll come back to them in a moment!
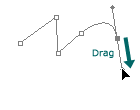
Now try creating a new anchor point by clicking the mouse to the right of your original anchor point, and dragging downwards:
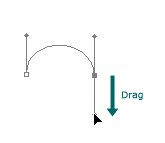
You've now placed a second anchor point, and created a curve between the two points!
Notice that you dragged upwards from the first anchor point, and downwards from the second. This follows the path of the curve - it goes up from the first point, and down as it reaches the second.
What would happen if you dragged upwards from the second anchor point too? Try it! (You may want to delete the Work Path and start again from scratch.)
This time, you can see that the curve moves upwards towards the second point, flipping direction as it does so. So the curve will always try to head in the direction you drag!
Practice drawing a few curves like these, dragging in different directions, until you're confident with the technique.

Note that when we're creating these curves we're always making smooth anchor points. In the Editing paths in Photoshop tutorial, we show you how to create corner anchor points too (take a look at the example path at the top of the Photoshop paths explained tutorial to see a corner point).
Switching between curves and lines
Often you'll want to create a path that contains both straight lines and curved lines. It's easy to switch between the two.
Start off drawing some straight lines by just clicking with the mouse:
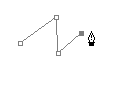
To switch to drawing a curve, click and drag with the mouse where you want the curve to end:
To switch back to drawing a straight line, create the anchor point of your last curve by clicking rather than clicking and dragging (in other words, make a corner point). Then click with the mouse where you would like the straight line to end:
Continuing paths
If you've previously left an incomplete path and you come back to it later, you can continue adding to the path by moving the Pen tool over either end of the path until it turns into the "Pick Up Path" cursor:
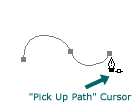
Note that you can't pick up a closed path in this way; however you can add and delete points on the closed path, and drag points around to achieve the new shape you need. You can also reopen a closed path - see the "Reopening and Joining Path Components" section below.
The Freeform Pen tool
You can use the Freeform Pen tool to quickly sketch out your path. It's not very accurate and often doesn't place anchor points where you'd ideally like them, but it is easy to use, which is a plus for beginners!
To use this tool, first select it from the Pen Tool icon in the Tools palette:
Then just click with the mouse and drag to draw your path:
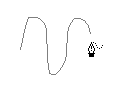
When you release the mouse button, the path is created:
You can adjust the frequency of the anchor points created by the Freeform Pen tool by altering the value in the Curve Fit box in the options bar. The higher the value, the less anchor points and segments will be created (but the less accurate the finished path will be, too!).
You can also make the Freeform Pen tool behave like the Magnetic Lasso tool by clicking the Magnetic checkbox in the options bar. The tool will then snap to the shape you're drawing around. See the Selecting with the marquee and lasso tools tutorial for more info on the Magnetic Lasso.
Quick tip
You can switch between the regular Pen tool and the Freeform Pen tool by pressing Shift+P.
Copyright© 2010-2012 Grook network
sitemap | Privacy Policy
Follow us on: ![]()
![]()
![]()
![]()
