Main menu
You are here
3DS Max Tutorial - Lights
Lights are objects that simulate real lights such as household or office lamps, the light instruments used in stage and film work, and the sun itself. Different kinds of light objects cast light in different ways, emulating different kinds of real-world light sources.
Lighting plays a critical part of any Max scene. Understanding the basics of lighting can make a big difference in the overall feeling and mood of your rendered scenes. Most Max scenes typically use one of two types of lighting: natural light or artificial light. Natural light is used for outside scenes and uses the sun and moon for its light source. Artificial light is usually reserved for indoor scenes where light bulbs provide the light. However, when working with lights, you’ll sometimes use natural light indoors, such as sunlight streaming through a window, or artificial light outdoors, such as a streetlight.
Default Light
Very handy and more useful than simple ambient light, default lights appear automatically whenever there are no other lights in the scene. They are two omni lights, one from above and to the left, the other from below and to the right. The default lighting disappears as soon as you put in any light and reappears if you delete all your lights.
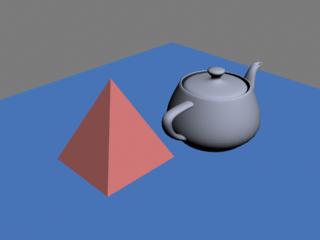
Figure 7-1: Objects rendered in default lighting
Default light can be very handy for quick renders or test renders where you want to check geometry or textures,
Ambient Light
Ambient light is the general light that illuminates the entire scene. It has a uniform intensity and is uniformly diffused. It has no discernible source and no discernible direction. In the real world, light reflects from one surface to the next over and over, perhaps millions of times, until all the light energy has been absorbed.
Ambient intensity, simply adds an illumination value to every pixel in the scene, regardless of any physical or environmental parameters. Ambient intensity is accessed through the Rendering>Environment menu option. Under the Environment and Effects panel, click on the Ambient swatch to get the MAX Color Selector.
Once in the Color Selector, you can select any color at any value for your ambient intensity. It has to be noted that it is the grayscale value (black/white value) that determines the lighting intensity value, and not the color.
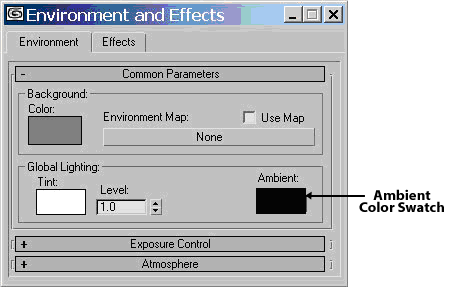
Figure 7-2: Environment and Effects window
Free Lights and Target Lights
Free lights are just lights that you place in your scene and aim wherever you want by moving and rotating them. Target lights, on the other hand, are directional lights or spotlights that come with an extra feature, a target. The light will automatically aim wherever you place the target.
Directional Light
Directional lights are different from all other lights in such a way that the light rays are parallel. Rather than emanating from a single point as in an omni light or spotlight, or emanating from over an area or a line, as with an area or linear light, the directional light’s light beams run parallel to each other in a cylindrical shape. A target directional light uses a target object to aim the light.
Because directional rays are parallel, directional lights have a beam in the shape of a circular or rectangular prism instead of a cone.
Spot Light
Figure 7-4: Spot Light
Omni Light
An omni light is simply a point in space that emits light omnidirectionally. You have the usual shadow, intensity, and color choices in the basic parameter rollouts.
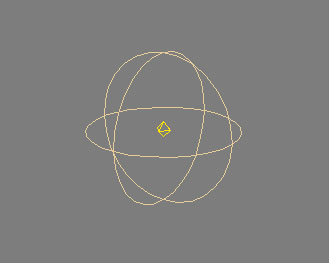
Figure 7-5: Omni Light
Omni lights can cast shadows and projections. A single shadow-casting omni light is the equivalent of six shadow-casting spotlights, pointing outward from the center.
Skylight
The Skylight light models daylight. It is meant for use with the Light Tracer. You can set the color of the sky or assign it a map. The sky is modeled as a dome above the scene.
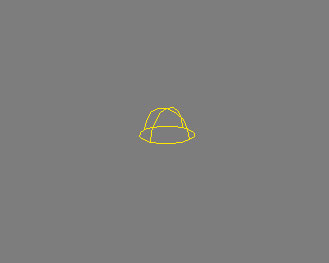
Figure 7-6: Skylight
Transforming Lights
Lights can be transformed just like other geometric objects. To transform a light, click on one of the transformation buttons and then select and drag the light.
Target lights can have the light and the target transformed independently, or you can select both the light and target by clicking the line that connects them. Target lights can be rotated and scaled only if the light and target are selected together. Scaling a Target light increases its cone or cylinder. Scaling a Target Direct light with only the light selected increases the diameter of the light’s beam, but if the light and target are selected, then the diameter and distance are scaled.
An easy way to select or deselect the target is to right-click on the light and choose Select Target from the pop-up menu. All transformations work on free lights.
Placing Highlights
The Place Highlight (Ctrl+H) feature enables you to control the position and orientation of a light in order to achieve a highlight in a precise location. To use this feature, you must select a light object in the scene and then choose Tools>Place Highlight, or click the Place Highlight flyout button on the toolbar. The cursor changes to the Place Highlight icon. Click a point on the object in the scene where you want the highlight to be positioned, and the selected light repositions itself to create a specular highlight at the exact location where you clicked. The light’s position is determined by the Angle of Incidence between the highlight point and the light.
Light Parameters
When a light is selected, several different rollouts appear. The options contained in these rollouts enable you to turn the lights on and off, select a light color and intensity, and determine how a light affects object surfaces.
General Parameters
The General Parameters rollout is displayed for all types of lights. These controls turn a light on and off, and exclude or include objects in the scene. On the Modify panel, the General Parameters rollout also lets you control the light’s target object and change the light from one type to another.
The General Parameters rollout also includes some settings for shadows. Shadows can be easily turned on or off. In this rollout, you can defer to the global settings by selecting the Use Global Settings option. This option helps to maintain consistent settings across several lights. It applies the same settings to all lights, so that changing the value for one light changes that same value for all lights that have this option selected.
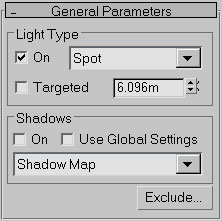
Figure 7-7: General Parameters rollout
You can also select from a drop-down list whether the shadows are created using Area Shadows, a Shadow Map, regular or advanced raytraced shadows, or a mental ray shadow map. A new rollout appears depending on the selection that you make.
Exclude button excludes selected objects from the effects of the light. Click this button to display the Exclude/Include dialog. Excluded objects still appear lit in shaded viewports. Exclusion takes effect only when you render the scene.
Intensity/Color/Attenuaion Rollout
Multiplier value controls the light intensity. A light with a Multiplier set to 2 is twice as bright as a light with its Multiplier set to 1. Higher Multiplier values make a light appear white regardless of the light color. The Multiplier value can also be negative. To the right of the Multiplier value is a color swatch.
Clicking the color swatch opens a color selector where you can choose a new light color.
Attenuation is the effect of light diminishing over distance. In 3ds max, you can set attenuation values explicitly. The effects can vary from real-world lights, giving you more direct control over how lights fade in or fade out.
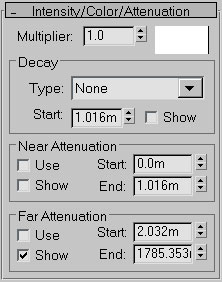
Figure 7-8: Intensity/Color/Attenuation rollout
Shadow Parameters
All light types have a Shadow Parameters rollout except Skylight and IES Sky. It lets you set shadow colors and other general shadow properties. This rollout can be used to select a shadow color by clicking the color swatch. The default color is black. The Dens setting stands for “Density” and controls how dark the shadow appears. Lower values produce light shadows, and higher values produce darker shadows. This value can also be negative.
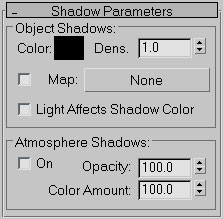
Figure 7-9: Shadow Parameters rollout
The Map option, like the Projection Map, can be used to project a map along with the shadow color. The Light Affects Shadow Color option alters the Shadow Color by blending it with the light color if selected.
In the Atmosphere Shadows section, the On button lets you determine whether atmospheric effects, such as fog, can cast shadows. You can also control the Opacity and the degree to which atmospheric colors blend with the Shadow Color.
Spotlight or Directional Parameters
The parameters rollout for spotlights and directional lights are identical. The same tools for spotlights and directional lights behave slightly differently, as outlined below.
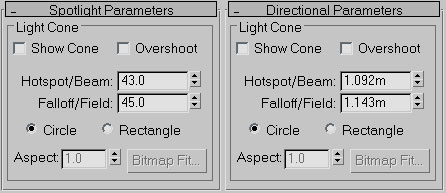
Figure 7-10: Spotlight Parameters & Directional Parameters
Light Cone
This area describes all the adjustable parameters of the light “cone,” which is in fact not always cone-shaped. A spotlight’s illumination shape does look like a cone, but a directional light’s light “cone” is cylindershaped.
Show Cone
Checking the Show Cone check box will allow you to see the light cone even if the light is not selected.
Overshoot
The Overshoot check box allows the directional light or spotlight to illuminate areas outside the light cone. This is helpful in a number of ways. For example, if you have a large outdoor scene, you will have to scale your directional light up to encompass the entire scene. Make a mistake and you’ll see the cone edge in your render. But if you select Overshoot, there will be no cone edge and the entire world will be illuminated by the directional light. In this way, a directional light is made to behave a little like the sun. For spotlights, sometimes you have your spotlight in the perfect position, but you just catch the edge of the beam in frame. Instead of having to reposition your light, just check Overshoot.
Hotspot/Beam
Most normal lights have a hotspot somewhere near the center of their light beam. This is usually because directed light, like that from a stage spotlight, uses imperfect optics, and either the reflective mirror behind the lamp or the lenses are causing imperfect light focus to concentrate some light in one area and less in another.
Falloff/Field
Falloff/Field is the area of illumination falling outside of the hotspot and going as far as the edge of illumination. Using combinations of Hotspot/Beam and Falloff/Field, you can create very hard-edged theatrical spotlights, very soft-edged light, or anything in between.
Circle/Rectangle
You can easily switch your beam shape from a cone to a rectangle with the Circle and Rectangle buttons.
Aspect
The Aspect numeric input and spinner controls how rectangular in shape a Rectangle beam is. For example, if you enter an aspect of 1.0, the light beam will be perfectly square. If you enter an aspect of 2.0, the beam will be twice as wide as it is high, and so forth.
Bitmap Fit
If you choose a rectangular beam, you can automatically set the aspect with the Bitmap Fit button. Selecting this button brings up a file dialog. When you select a valid image file, the light’s aspect will automatically be adjusted to match that of the selected image.
Advanced Effects
Options in the Affect Surface section of the Advanced Effects rollout control how light interacts with an object’s surface. The Contrast value alters the contrast between the diffuse and the ambient surface areas. The Soften Diffuse Edge value blurs the edges between the diffuse and ambient areas of a surface. The Diffuse and Specular options let you disable these properties of an object’s surface. When the Ambient Only option is turned on, the light affects only the ambient properties of the surface.
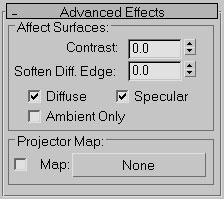
Figure 7-11: Advanced Effects rollout
You can use any light as a projector; you find this option in the Advance Effects rollouts. Selecting the Map option enables you to use the light as a projector. You can select a map to project by clicking the button to the right of the map option. You can drag a material map directly from the Material/Map Browser onto the Projector Map button.
source : expertrating.com
Copyright© 2010-2012 Grook network
sitemap | Privacy Policy
Follow us on: ![]()
![]()
![]()
![]()
