Main menu
You are here
Prevent Accidental Shutdowns in Windows 7
![]()
You may be too young to remember but computers weren’t always shut down using the operating system. In fact, unlike today’s soft power on and off buttons found on most computer cases, computers years ago had a hard on and off button that wasn’t easy to push accidentally.
Computer case manufacturers do little to prevent accidental shutdowns; the power button on most modern computer cases is often prominently placed on the front of the computer with no bezel around it to prevent someone from brushing his/her hand against it causing Windows 7 to shut down. If this is a problem for
you, you can force Windows 7 to take an alternative action when you push the power button on the front of your computer.
Prevent Windows 7 Accidental Shut Downs
In a recent article, we discussed how to remove the shut down button from the Windows 7 login screen. This effectively forces users to log in before they could shut down the computer. Of course, this does not prevent just anyone with physical access to the computer from pushing the power button on the front of the computer’s case.
To prevent Windows 7 accidental (or purposeful) shut downs, begin by logging in to Windows 7 with an account that has administrative privileges or at least privileges to change the power settings for the account.
Click on Start>Control Panel and click on the link titled Appearance and Personalization.

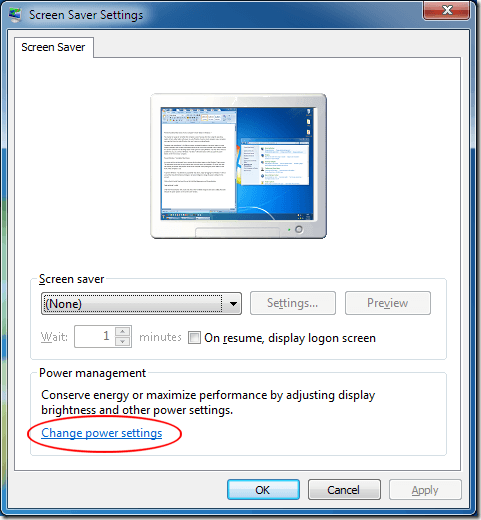
Under the Personalization link, locate and click on the link titled Change Screen Saver. Oddly, Microsoft still puts the power options on the screen saver window. In the Screen Saver Window that opens, locate the Change Power Settings link at the bottom of the window and click on it.
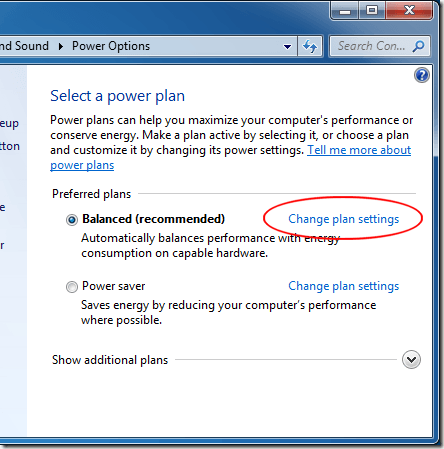
You should now be looking at the Select a Power Plan window. Here, your current power plan is selected and active. Next to the plan you are currently using, click on the Change Plan Settings link.
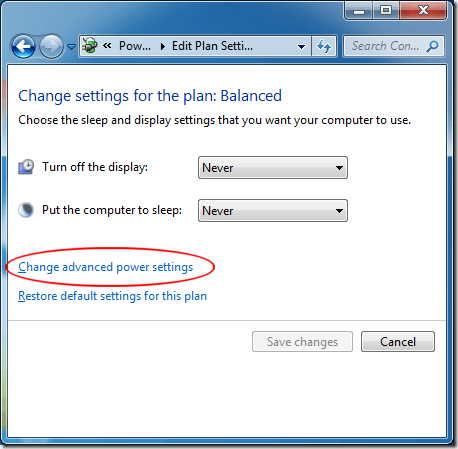
In the window that opens, you can change the basic functions of your power plan settings. These functions include turning off the display and putting the computer to sleep. However, we need to change the advanced power settings. On this window, locate and click on the link titled Change Advanced Power Settings.
In this Power Options window, you can change many aspects of your current power scheme’s behavior. In the center of the window, scroll down until you see an option titled Power Buttons and Lid. Click on the plus symbol next to it and then click on the plus symbol to expand the option titled Power Button Action. Finally, click on the link labeled Shut Down.

Depending on the features of your computer, you likely have four options here:
- Do Nothing
- Sleep
- Hibernate
- Shut Down
Here you have to make a choice as to how your computer should respond when you press the power button on the front of your computer. The safest option is to choose Do Nothing. Using this option, absolutely nothing will happen when you push the power button. This effectively forces you to use the Shut Down button on the Start menu whenever you want to shut down your computer. When you have made your choice, click the OK button and you are done.
Preventing accidental shut downs in Windows 7 is as simple as modifying a default power setting option. Of course, you need to make this change for every account on your PC.
By setting the power button on a computer to Do Nothing rather than Shut Down, you’ll never again have to worry about accidentally hitting the power button on the front of your computer and losing all of your work.
If you often find yourself touching the front of your computer because you need to insert and remove media from the your PC, this option can save you from the headaches of losing your work.
sourcE: helpdeskgeek
Copyright© 2010-2012 Grook network
sitemap | Privacy Policy
Follow us on: ![]()
![]()
![]()
![]()
