Main menu
You are here
Data Recovery Tutorial: How to Slave a Hard Drive
In data recovery it is NEVER a good idea to install, copy, surf the Internet, reboot the machine, or do ANYTHING on the hard drive you are now trying to recover the data from. I often tell customer they need to Slave the hard disk to another computer, or put it in a USB chassis. What is difficult is the fact that the average home user has no idea how to do this, and it can be a very daunting task.
The following is a step by step walk through, with pictures on how to remove a hard drive from a computer, slave it to another and then be able to do a safe recovery of the hard drive. If the hard drive isn’t seen in the BIOS or is making noises you more than likely need hard drive recovery.
Tools needed: Phillips head screwdriver and a marker.
Step 1: Shut the PC down and unplug the power.
Step 2: Let’s take a look at the back of the computer and see that we need to unscrew and do in order to get the case open. It varies from model to model, so I am showing you on a standard tower case. You will see that there are screws holding on the side panels of the computer. You will need to remove both sides of the tower in order to free the hard drive.

After you remove the sides you will have a front and a back so to speak.
Front

Back

Step 3: While looking in the front we are going to locate and remove the hard drive. You will see below that the hard disk is located near the bottom of the drive chassis in side (the pink area I have highlighted). This is usually the case for most computers.

Step 4: We are going to need to remove the screws from the front and then go around the back of the pc and remove the screws on that side also.
Front Screws

Back Screws

NOTE: there is USUALLY a way to access these screws from the back. If there is not, I would contact, you local computer store fro help as it can become an issue of having to remove the motherboard and other peripherals.
Step 5: Now I want you to remove the power from the Hard Disk. This is a small cable with one red wire two black wires and a yellow wire running into a white connector. Be gentle and slowly pull the cable out, it may be a tight fit so usually slowly rocking it left and right will help remove it.

After you have unplugged it, take a marker and put a mark on it, this will help you to know which one to use when you put the drive back later.
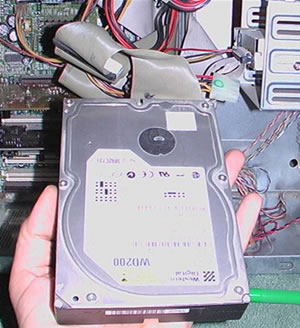
Step 6: Here comes one of the hardest parts, removing the hard drive from the chassis. You are going to want to try and push, any cables in the way of the rear of the drive, up and out of the way. Firmly grab the back and top of the hard drive and pull back to free it.
PLEASE do this gingerly as you do not want to damage any other internal components.
Step 7: Now that the hard drive is free, Flip the hard drive over so that you are looking at the “green board” take you marker and make an arrow that is pointing to the power. This will help you to know which connector to use and which way it is supposed to be plugged into the drive.
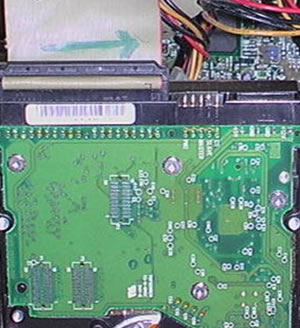
Step 8: Holding the hard drive firmly, grab the cable and pull it out. This is another one of those tight cables. Be patient and careful, you don’t want to snap any of the pins off or break the cable.

Step 9: Ok so now we have the hard drive free from the computer, we need to set it to be a slave in the computer you are moving it to. If you take a look at the back of the hard drive there will be a set of pins usually located between the power and hard drive cables.
Now here is the tricky part.
Since Seagate owns Maxtor and Western Digital is the next most popular hard drive I will cover a Maxtor and Western Digital drives for how to set jumpers. (Almost all manufactures keep the jumper setting on the top of the drive on the label) Western Digital: If you look at the green board you will see that near those pins there are labels CS SLAVE MASTER PM2. You are going to want to put the jumper (which should be there already) on SLAVE.

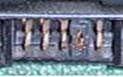
Seagate/Maxtor: This manufacturer is the exact opposite of Western Digital. When you want to make a drive a slave you must make sure there is no jumper on the first set of pins next to the hard drive cable. Maxtor/Seagate have a very clear diagram on the top of their hard drives to explain how to set up as slave.

Step 10: Now that you have made the drive a slave, you can now move it to another computer, to attempt recovery. To do so please start by repeating steps 1 and 2 from above.
Step 11: Ok now another tricky part, putting the drive into the other computer. (for the sake of this walkthrough I am just re-inserting the drive into the same computer)What we need to do is now put the drive into an empty bay in the computer. And put one screw into the side. This is just to hold it in place while you do the recovery.

Step 12: Now find the hard drive cable coming off the hard drive that was already in the machine. To avoid a very lengthy explanation, I am just going to have you disconnect the cable from the hard drive. While looking at the cable you are going to want to connect the very end to the drive you are attempting to recover and the second from the end to original hard drive in the machine.
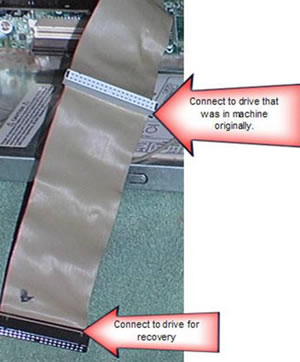
Step 13: Now connect a free power connector to the hard drive.
NOTE: if you do not have a free power plug you may need to buy a power splitter from your local PC Company.
The image below is what everything should look like when you have connected all the cables.

Step 14: Now replace the sides of the computer, and plug it back in. You should be able to boot into Windows now and attempt recovery.
Source : dtidata.com
Copyright© 2010-2012 Grook network
sitemap | Privacy Policy
Follow us on: ![]()
![]()
![]()
![]()
